Install the appliance
This is the complete, click-by-click walkthrough to stand up an Acutis collector from scratch. Two ways to deploy:
- Mini-PC / Raspberry Pi → download a USB installer pack and flash a stick (this page, steps 1–5).
- Virtual machine → download a seed ISO and attach it (see the VM path at the bottom).
The whole thing is zero-touch: you put your custom config on the media, boot once, and the box provisions itself — no SSH, no manual package installs, no typing commands into the appliance.
Time: ~10 minutes of your attention
~3 min to flash the USB, a couple minutes to drop your config on it, then it's unattended. The appliance appears on The Floor a few minutes after first boot.
What you'll need
- A mini-PC or Raspberry Pi 5 (8 GB) on your management VLAN (see Requirements for specs). Pi 5 needs an NVMe SSD — SD cards are not supported.
- A USB stick (8 GB+).
- A second computer (Windows/Mac/Linux) to flash the stick.
- Your Acutis login (you'll download your pre-configured pack from the dashboard).
Step 1 — Download your installer pack
Sign in at app.acutisgo.com. New accounts land on the Deploy your collector screen automatically; if you're already in, open it from The Floor → "⬇ Installer pack" (or Add New Site).
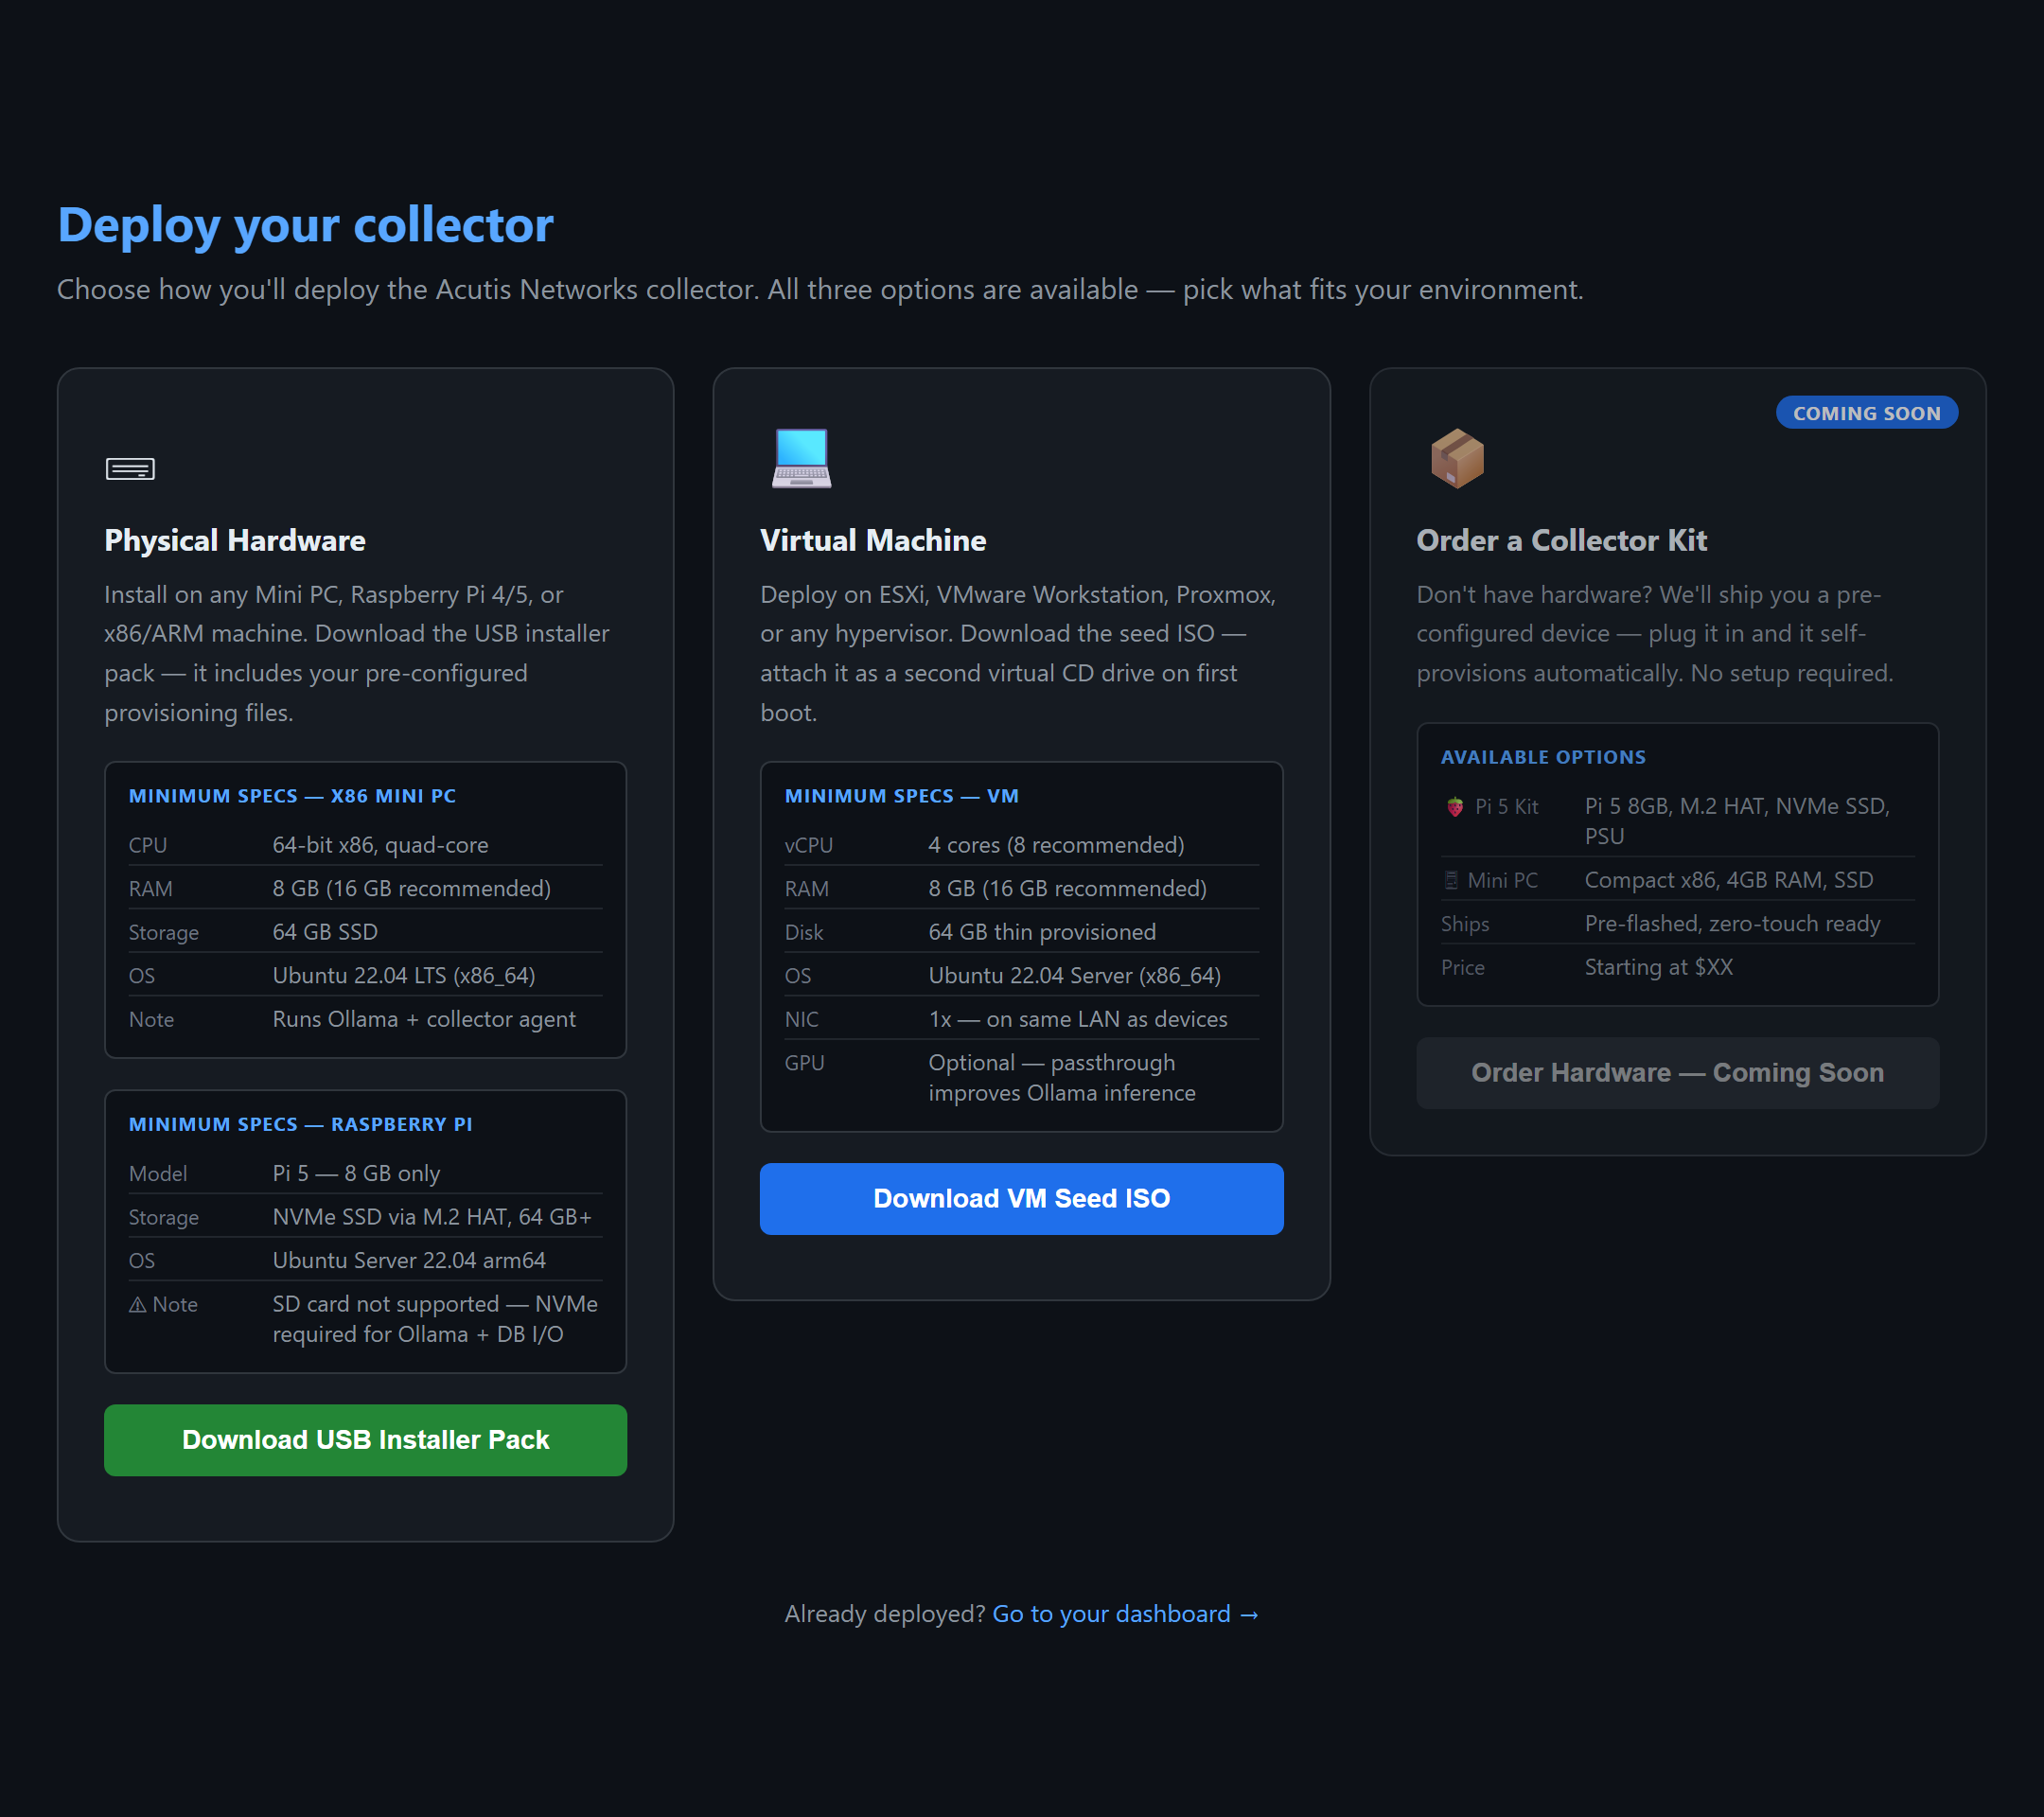
On the Physical Hardware card, click Download USB Installer Pack. You'll get a ZIP — acutis-installer.zip — containing:
| File | What it is |
|---|---|
provision.conf |
Your custom config — your one-time provisioning token, tenant ID, and backend URL. This is the "secret sauce" that ties the appliance to your account. |
user-data |
Cloud-init answers that make Ubuntu install unattended (no install-wizard clicking). |
meta-data |
A small placeholder cloud-init requires alongside user-data. |
grub.cfg |
Pre-sets the boot menu entry to "Install Acutis Agent" with the right parameters — so you don't edit anything by hand. |
README.txt |
These same steps, in the box. |
Each download is single-use
Every time you download the pack, Acutis mints a fresh credential and invalidates the previous one. So download it once per appliance, right before you flash — and if you re-download, re-copy provision.conf to the stick (the old one stops working).
Step 2 — Flash Ubuntu Server to the USB
The pack provisions Ubuntu Server 24.04 LTS — you flash the stock Ubuntu installer, then drop your config onto it.
- Download the Ubuntu Server 24.04 LTS ISO from ubuntu.com/download/server (pick arm64 for a Raspberry Pi, amd64 for an x86 mini-PC).
- Flash it to your USB stick with one of these:
Use Rufus (free):
- Open Rufus, select your USB stick under Device.
- SELECT → choose the Ubuntu ISO.
- Leave defaults, click START → accept "Write in ISO Image mode".
- Wait for READY, then close Rufus.
Use balenaEtcher (free):
- Flash from file → choose the Ubuntu ISO.
- Select target → your USB stick.
- Flash! → enter your password → wait for "Flash Complete".
Use the Raspberry Pi Imager:
- Choose OS → Other general-purpose OS → Ubuntu → Ubuntu Server 24.04 LTS (64-bit).
- Choose Storage → your USB/NVMe.
- Write.
Step 3 — Apply your custom config to the USB
This is the step the appliance can't do for you. After flashing, the USB will mount as a couple of drives. Unzip acutis-installer.zip and place the files like this:
USB stick  (the Ubuntu Server installer you just flashed)
├── nocloud/
│   ├── provision.conf   ←  your custom config (token + tenant + backend)
│   ├── user-data        ←  unattended-install answers
│   └── meta-data        ←  placeholder cloud-init needs
└── boot/
    └── grub/
        └── grub.cfg      ←  replace with the one from your pack
- Create a folder named
nocloudat the root of the USB if it isn't there. - Copy
provision.conf,user-data, andmeta-dataintonocloud/. - Copy
grub.cfgfrom the pack into the USB'sboot/grub/, replacing the existing file. (This is what makes the boot menu read "Install Acutis Agent" and pre-loads the autoinstall settings.) - Safely eject the USB.
That's the only file handling you do
Everything else — partitioning, OS install, the collector, the local AI — happens on its own at first boot.
Step 4 — Boot the appliance from the USB
- Plug the appliance into your management VLAN (the network it will watch) and into power.
- Insert the USB stick and power on.
- If it doesn't boot from USB automatically, open the boot menu (usually F12 / F10 / Esc at power-on, varies by hardware) and pick the USB.
- At the GRUB menu, select Install Acutis Agent (it's pre-selected). Ubuntu installs unattended — no questions to answer.
- When it reboots and asks, remove the USB.
Step 5 — It self-provisions (watch The Floor)
On the first real boot the box does everything itself: fetches the latest provisioning script, activates your token, installs the collector, writes your secrets to a root-only file, starts the service, and kicks off the local AI install in the background.
Within a few minutes the appliance checks in and appears on The Floor, reporting its gateway and subnet. Onboard your first device (see Onboarding devices) and the map starts filling in.
Done
No commands were typed into the appliance. The pack carried your identity; the box did the rest.
The VM path
Running on a hypervisor (ESXi, Proxmox, VMware, Hyper-V) instead of bare metal? Skip the USB entirely:
- On the Deploy your collector screen, use the Virtual Machine card → Download VM Seed ISO (or generate one from Dashboard → Add New Site).
- Create a VM to the Requirements spec and start the Ubuntu Server 24.04 install (or import the Acutis collector OVA if you have it).
- Attach the seed ISO as a second CD/DVD drive. Cloud-init reads it on first boot and provisions the collector identically to the USB path.
- Once it checks in on The Floor, you can detach the seed ISO.
Verify it's running
You normally never need to — The Floor is the real confirmation. But if you want to look under the hood, SSH in as networkops:
systemctl status network-collector            # is the collector up?
journalctl -u network-collector -f            # watch it poll + check in
cat /opt/acutis-collector/firstboot.log       # the provisioning log
cat /opt/acutis-collector/ai-status           # local AI: installing | ready | failed | not_installed
What first boot actually does (for the curious)
The one-shot first-boot unit runs firstboot.sh, which:
- Reads your
provision.conf(token + backend URL). - Waits for the backend to be reachable (retries ~2 min).
- Activates the token → resolves your tenant API key (self-service uses the token directly; MSP mints a new tenant via
/api/v1/provision/activate). - Downloads
collector.py, builds a Python venv, installs pinned deps. - Writes secrets to a root-only
/etc/acutis-collector.env(0600) — never the world-readable systemd unit. - Installs + starts
network-collector.service(runs as the unprivilegednetworkopsuser). - Launches the local AI install in the background (non-fatal if blocked).
- Deletes
provision.confso the token can't be reused, and disables itself so it never runs again.
It's idempotent — re-running just ensures the service is up.
Updates
The appliance updates itself: each cycle it compares its code hash to what the backend advertises, and on a mismatch it pulls the new collector.py over the cert-pinned channel, verifies the published SHA-256, confirms it compiles, atomically swaps it, and restarts. No patching, no re-imaging.
Stuck? See Troubleshooting. Next: Provisioning details · Onboarding devices.